10/28/2016

How to Get Back My PDF Files Disappeared from My iPhone 7

"Do you know about how to recover PDF files from iPhone 7? My PDF files disappeared accidently from iPhone 7, now I have no idea about how to recover these data, help me please!" Below is a tutorial to teach us how to fix that case.

How to fix the PDF files disappearing issue


Step 1: Connect the device to your computer, and turn on iTunes. When connected, in iTunes, go to Books tab to see book sync information. Check if your sync setting is set to “Selected books”. If it is, then change the setting to “All books”. Click “Sync” button to manual sync. Check your device to see the PDF files are in iBook.

Step 2: If you have never closed the iBook app, try to close it, and run again. Try to restart your device.
Step 3: If possible, try to delete the iBook app, and re-install the iBook app. Or Check the iBook and make sure it’s the latest version. If it’s not, then download the latest iBook from App Store.


Step 4: If you have purchased books, go to App Store -> go to “Purchases” -> re-download the books. No matte PDF files or others.
Step 5: If you have a backup in iTunes, try to restore your device with the latest backup. (For example, if you connect your iPhone 7 to your computer, it will have a backup file in iTunes.)

This problem looks like happened usualness, and it is still happening. Many people are saying that this is a bug. In case the above did not work for you, we will keep update this blog post when we find a new fix for this book & PDF disappearing problem.

How to recover PDF files to iPhone 7 from Computer


If you have backup PDF files on computer, here you can try to transfer PDF files from computer to iPhone 7. Detail steps below. Using the following steps, you can restore your documents and folders (containing documents and sub-folders).


Step 1: Connect your iPhone 7 to your Mac/Windows computer using the cable. Launch iTunes (if it does not open automatically).
Step 2: Click the iPhone 7 button. In the screen showing your iOS device information, click the Apps tab.

Step 3: Scroll down to the File Sharing section near the bottom of the iTunes window.  If you do not see the File Sharing section, maximize the iTunes window.
Step 4: Select Adobe Acrobat in the Apps section (the left side of the File Sharing section). Click the Add button.

Step 5: Select the documents and folders that you want to copy to your iPhone 7. Then click the Add button in the dialog.
Warning: Do not unplug the cable while documents are being transferred.

After reading the whole post, have you got how to fix PDF files disappeared from iPhone 7? If you have any troubles about iPhone 7, you can get solutions on our website.

9/27/2016

How to Fix iPhone 7 Keeps Saying Searching for Service

In nowadays, we are used to get answers on Internet, no matter what questions confused us. So if the trouble to you is about iPhone 7 keeps saying searching for service, how can you fix it? Below we can get answers.

The reason for iPhone 7 keeps saying searching service


There are many factors that can trigger errors like "No Service" and "Searching" network to occur on your iPhone.

In most cases, the problem is tied to a faulty SIM card while others are due to some network outages, particularly cellular network. Others have also encountered the same error prompt after performing a software update. Software updates can contain some bugs that may affect device functionalities including its ability to search for cellular signals.


Since downgrading is typically discouraged by most carriers and Apple itself, users may just have to wait for the next firmware update containing fixes. But if you can't take waiting for the next software update rollout as an option, then you may resort to any workarounds available in order to obtain temporary remedy.

Important Notes:
Before you begin, make sure cellular network is available in your area.
If your iPhone can't connect to cellular network, go to your iPhone settings and then check if Cellular is enabled or turned on.

The solution to fix iPhone 7 keeps saying searching service


Step 1: Reboot your iPhone 7. Many issues associated with the firmware can be rectified by a simple reboot on the device.
Step 2: Remove and re-insert the SIM card. As I mentioned above, many cases of iPhone showing No Service or Searching for network prompt are associated with incorrect SIM card installation, and worst, a damaged SIM card.

Step 3: Remove any third-party accessories like casing or covers from your iPhone 7. Then disable Airplane Mode. To ensure the Airplane mode is not turned on.
Step 4: Reset network settings. Resetting your network settings will likewise reset network information including your Wi-Fi network and passwords, cellular settings, as well as VPN and APN settings you've used.


Step 5: Check time and date settings on your iPhone 7. Others have also found that No Service or Searching network error prompt is due to an incorrect time and date settings on their iPhone.
Step 6: Perform the drop test or banging trick. This trick involves dropping your iPhone at some height.

In the other hand, if the trouble for you is about iPhone 7 stuck issues, you can try iCareFone to help you fix all common iOS issues in safest way.

In the end, have your acquired how to fix iPhone keeps saying searching service in safest way? If not, you can try to read again. Welcome to leave any trouble on our website comment section.

8/22/2016

How to Fix iPhone 6s Not Detected by iTunes Windows 10

In the case of iPhone 6s not detected by iTunes Windows 10, how to we backup the data on iPhone? This is a much complex situation to a part of Windows 10 users. Below we can get answers about how to fix that trouble.

How to fix iTunes does not recognize iPhone 6s


Step 1: To check whether the latest version of iTunes. Opening the help, click Check for updates.
Step 2: Check your data lines at both ends is not plugged in or if there is damage, if you have another data lines, try to replace a data cable testing.

Step 3: Check your computer is connected to the USB port there is no problem, if the iPhone 6s still does not appear in iTunes, try using a different USB port.
Step 4: To see what other software is configured properly. Verify installation Apple Mobile Device Support. Open the computer's control panel, click "Uninstall a program" to see Apple Mobile Device Support appears in the list of currently installed programs.

Step 5: Internal diagnostics running iTunes. Opening the help, click diagnosis, uninstall iTunes, re-install, or use other third-party software.

How to fix Windows version of iTunes does not recognize iPhone 6s


Restart iPhone
Step 1: To restart the iPhone 6s, please press and hold the "Sleep / Wake" button until the red slider to turn off iPhone.
Step 2: Slide your finger slide later iPhone shuts down. Next, press and hold the "Sleep / Wake" button until the Apple logo appears to turn iPhone.

NOTE: After restarting your phone, it is recommended to reboot the computer also.
iPhone is not responding? To force restart iPhone, hold down the "Sleep / Wake" button and the "Home button" at least ten seconds, until the Apple logo appears. If the device does not turn on or displays a red battery icon, try recharging.


Re-charge iPhone
Option 1: If iPhone is extremely low power or battery is completely discharged, or use the AC adapter to connect it to a high-power USB ( USB on your computer) to charge.
Option 2: If the iPhone's battery is very low, the display may be blank for up to two minutes before displaying a low battery image. If iPhone displays a low battery image, it may need to be charged for at least 20 minutes to start. You can press the Home button to view the current state of charge.

If the trouble to you is to reset iTunes backup password, you can learn to use the professional iPhone Backup Unlocker to help you. In only 3 steps, you can reset the password quickly.

After reading the whole post, you can decide which methods is best for you to fix iPhone 6s not detected by iTunes Windows 10. If you have any trouble, leave a comment on our site.

7/27/2016

How To Fix iPhone SE Freeze While Installing

Nowadays, iPhone has become the popular brand in phone field. So when you face iPhone freeze, how can you fix that case immediately? To most users, they don't know how to solve that problem in common way. So below we can learn how to fix iPhone SE freeze roundly.

Top 3 ways to restart iPhone SE from freeze


Top 1: First, we can press the power button more than 10 seconds, generally start automatically restart, and then restored. 

Top 2: Press the power button does not work, we will then long press the power button and home key more than 5 seconds, the phone that is, will be forced to shut down, shut down and then restart. 


Top 3: Sometimes due to the software and the system does not appear particularly serious modest capacity of the case, namely the case of the above methods do not work, we can use the phone while the charger plug in the power press the power button "plus" "Home key ", or else let the phone keep on the card, and other power completely exhausted when we connect the power supply and turn on to.

The reason to cause iPhone SE freeze


Reason 1: You have a problem .iPhone operation when entering the program slower or not to carry out other operations while repeatedly.

Reason 2: There is an incompatibility between the software installed, you can go to a specific forum to see, while I use the dock while back and PDF reader will crash. So you'll let your phone software crash deleted ok.

Reason 3: If you delete the incompatible software you still love crash. Then re-brush machine. The best way to recover is then cracked to 1.1.4.

How to use Reiboot to fix iPhone Freeze


Reiboot is the powerful tool for us to fix all common iPhone common issues. Like iPhone crashing/freezing. Below we can follow the 3 steps guide to fix iPhone freeze easily.

Step1: Download Reiboot and install it on any accessible computer. Then click "trust" to connect iPhone with computer.

Step 2: Click "Enter Recovery Mode" to enter recovery mode fix iPhone SE stuck. In this process, you will find the tool is searching your devices issues.

Step 3: Here to click "Exit Recovery Mode", then your freeze iPhone SE will restart. In only one minutes late, you will find everything is OK for your iPhone SE.

After reading the post, have your acquired how to fix iPhone SE freeze in several minutes. Do you know the reason about your iPhone SE freeze? If you have any other questions about iPhone SE, you can comment on our site, we will fix your problem in the first time.

7/21/2016

iPhone Won't Connect to the Network after iOS Update

Your iPhone won't connect to the network after iOS update and you don’t know why.  There are a lot of maybes when it comes to diagnosing and solving this problem. In this article, I’ll introduce you some good ways to fix the problem, whether it’s with your iPhone or your wireless router.


1.Make sure your router is on and that you're within range

If you're too far from your router you won't get a signal, so make sure you're within range.


2.Make sure Wi-Fi is on and that you can see your network

Tap Settings > Wi-Fi and make sure Wi-Fi is turned on. Tap the name of your Wi-Fi network to join. A blue checkmark beside a network name means you're connected. Or get help if you can't turn on Wi-Fi.


3.If prompted, type in your Wi-Fi password

If prompted, enter the password for your Wi-Fi network. Learn what to do if you don’t know your password.


4.Check all of your cables and connections.

If you still can’t connect to your network or get online, make sure your router is connected to the modem and turned on.


5.Restart

For more help, try restarting your device, router, or cable/DSL modem. After each step, check to see if you fixed the issue.
  • Restart your iOS device.
  • Unplug your router and plug it back in.
  • Unplug your cable or DSL modem and plug it back in.

6.Still can’t connect?

Reset your Network Settings. Tap Settings > General > Reset > Reset Network Settings. This also resets Wi-Fi networks and passwords, cellular settings, and VPN and APN settings that you’ve used before.

Get more help

1) If someone else set up your network, ask them for help. If you’re using a network at a company, school, hotel, store, or other free Wi-Fi location, find an employee for assistance.
2) If you're connected to a Wi-Fi network but you can’t get online, try to use your Wi-Fi network on other devices. If you can’t get online using your other devices, there might be a service outage. Call your cable company or internet provider for help.
3) Try connecting to a Wi-Fi network in a different location. If your device can connect, you’ll need to get help with your Wi-Fi network. If it can’t connect to any Wi-Fi networks, contact Apple.
4) Update your Wi-Fi router with the latest firmware and make sure the router supports your Apple product. For more information, contact the manufacturer of your router.

Hope one of the ways can help you fix the iPhone won't Connect to the wifi problem.


6/30/2016

How to Recover Deleted Photos from iPhone SE

There are a lot of upset thing in our daily life. Many users are in the habit of playing their iPhone SE everywhere. Such as you delete your beloved iPhone SE all of a sudden, or fell it into a sink or toilet. Then made it be an iPhone SE that losing data. So, the iPhone SE will also get your iPhone SE photos missing. If you meet this miserable situation, or you want to know how to recover deleted photo from iPhone SE, how do you save your iPhone SE, you can read this article about the solution of it.


Here I will introduce a powerful and professional program, which is Tenorshare iPhone Data Recovery software. It is designed to help iPhone/iPad/iPod touch users to retrieve deleted pictures from iPhone on Windows platform or Mac version. It now can work in three ways, which are shown in details as below. You can download it to have a try, and you will find out that all your data including images, messages, contacts, notes, videos, etc. can be restored with this powerful software.

Now let's see how to use this software to recover deleted iPhone SE photos as below:

Tutorial 1: How to Recover Photos from iPhone Directly

Step 1: Connect your iPhone to your computer
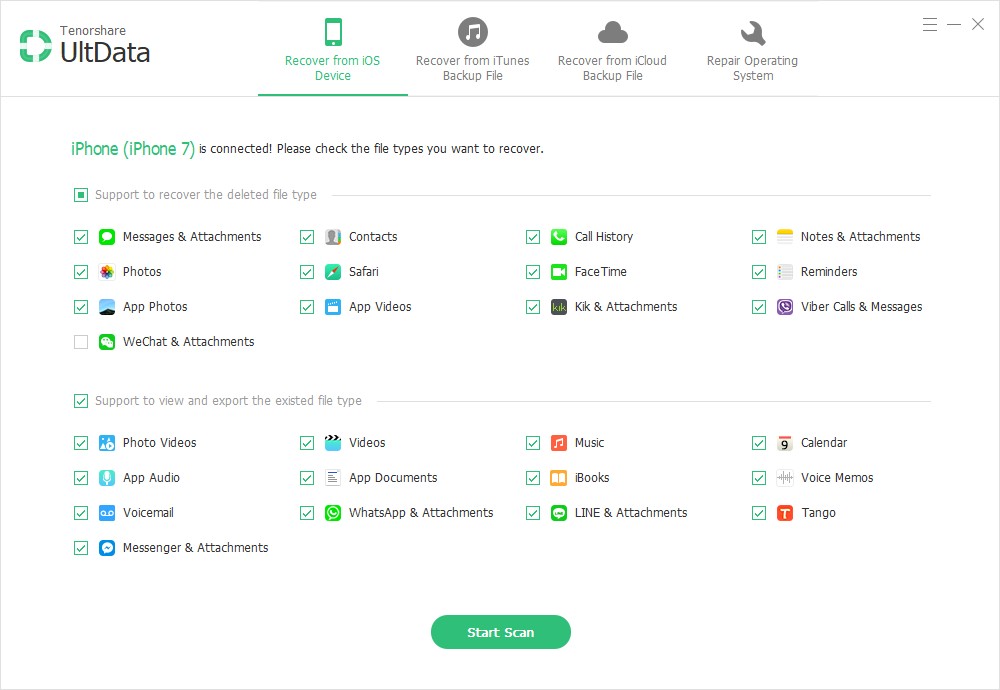
Connect your iPhone to your computer and launch the iPhone Data Recovery on it, you will see the interface as follows:


Step 2: Start to scan your iPhone to search for deleted photos
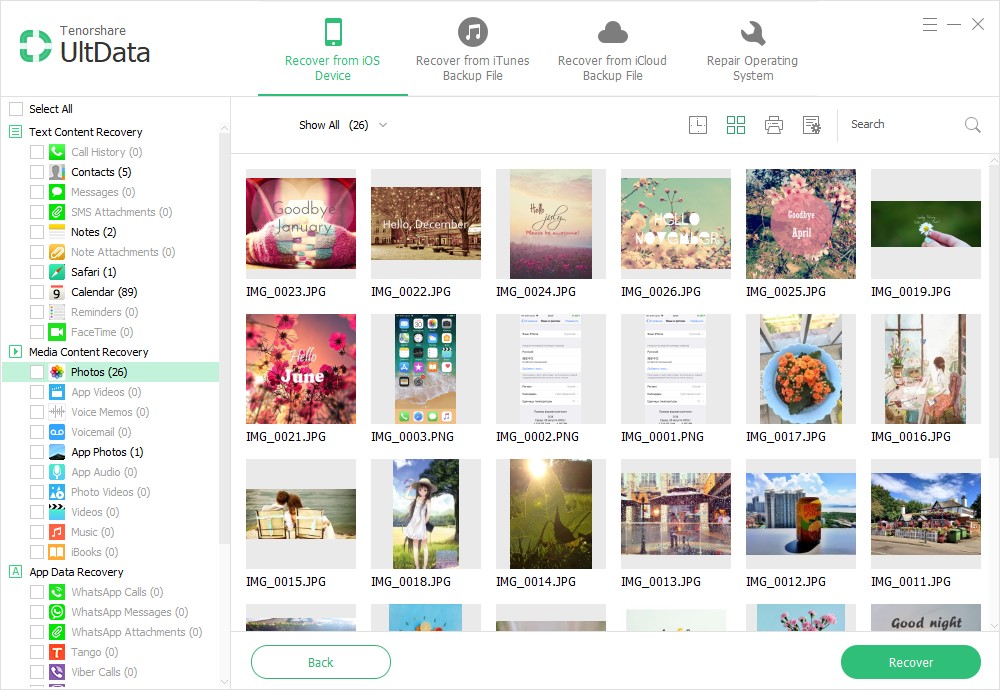
Choose "Recover from iOS Device" option, afterwords, you need to click "Start Scan" button. From this moment, the program starts to scan the whole files of your iPhone, and you will get the window as follows:


Step 3: Preview and restore photos from iPhone
After a while, you can see all the found photos in camera gallery, to preview your photos, you can choose "Camera Roll" or "Photo Stream". The photos to be selected are not only the deleted ones but also the remained ones. Since you want to recover those deleted pictures, you should refine the result by turning on the button. Mark those you want, and click "Recover" to save them on your computer.


Tutorial 2: How to Recover iPhone Photos from iTunes Backup

Step 1: Choose iTunes backup and scan it
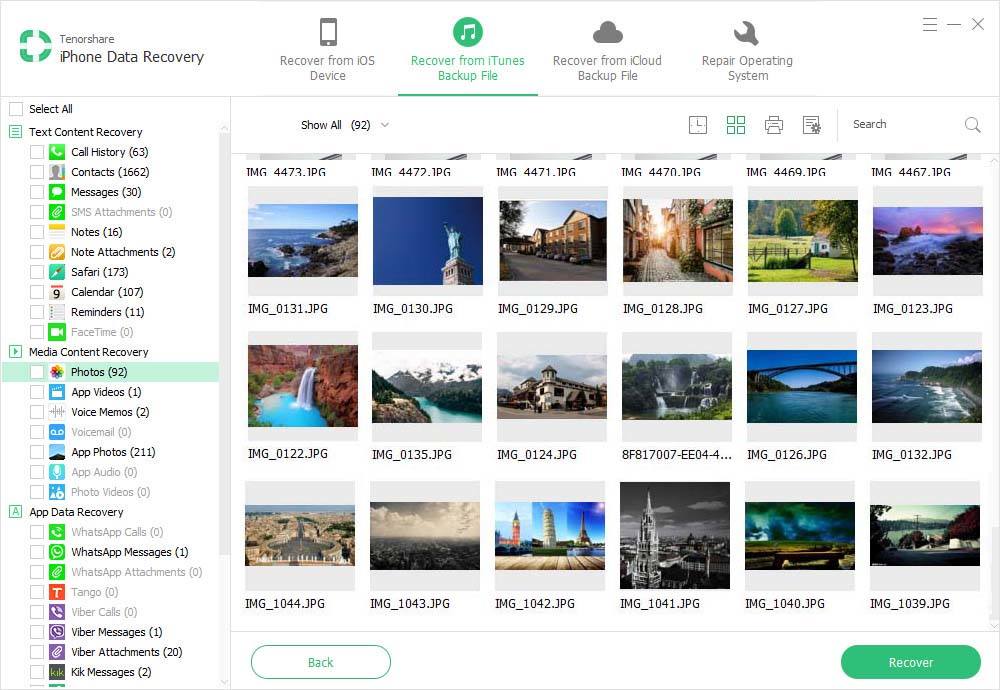
Choose "Recover from iTunes Backup File" option, when launching the program on your computer. Then, you'll get the interface below. Choose the latest iTunes backup of your iPhone, and click "Start Scan".

Step 2: Restore deleted iPhone photos
Being scanned, all found data are in order. You should preview carefully to choose those you want and click "Recover" to save them on your computer.


Tutorial 3: Recover Lost Data from iCloud Backup

Step 1: Install the program and sign your private iCloud account.
First of all, run the program and choose "Recover from iCloud Backup File" option, and sign in your iCloud account after all the preparation.

Step 2: Download and export your iCloud backup
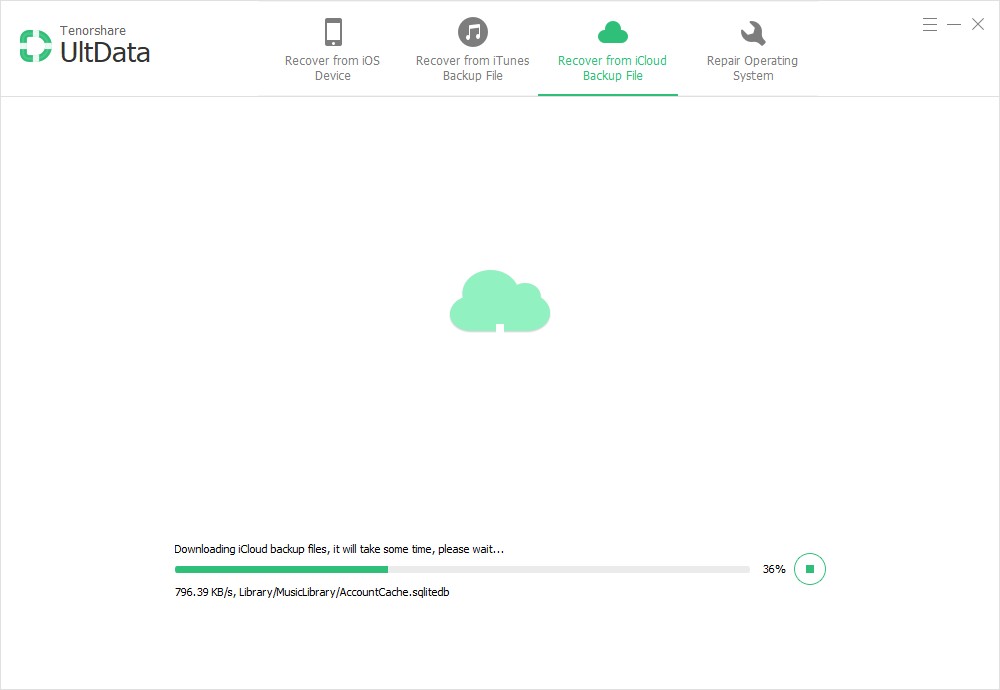
After entering the program, you are provided the backup files of your iCloud backup account automatically. Choose any data you want to recover by clicking "Download" button. The whole progress of downloading depends on the amount of your data. When it's complete, click the same button to start extracting, and you'll get a interface as below.


Step 3: Preview and restore photos from iCloud
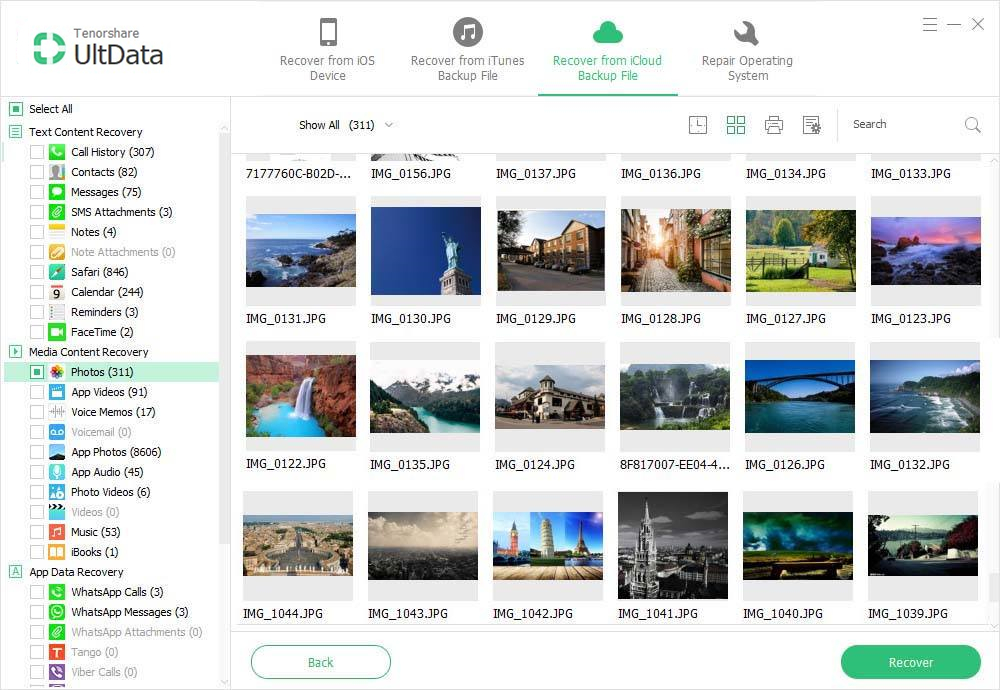
You can take a preview of the data you get after the scanning, such as contacts, photos, messages, notes, videos, etc. You can choose any data that you'd like to restore by ticking it.

6/24/2016

How to Recover Lost iPhone Photo Stream

With technology development in mobile devices, nowadays, people prefer to take pictures with their smartphone than a big clumsy camera. However, follows the need to recover the lost photos. You know, there are several situations may result in loss of photo stream on iPhone SE/ 6s/6/5s/5c/5/4s, for example, accidentally remove, iPhone broken, errors that occur during the synchronization, and so on. In the next part, we will show you how to recover lost photo stream on iPhone. Just check and find which works for you.


Method 1: Recover Lost Photos Stream of the iPhone with the backup file


Instead of retrieving all the data from iTunes, you can restore selected data from iTunes backup file. In this case, you need to resort to iPhone Data Recovery Tool, which has the Windows and Mac versions.

You don 't have to connect your iPhone to PC. Just download and run this tool on your computer. Then switch to "Recover from iTunes backup files", select your iPhone's backup and click the "Start Scan " button to scan your iPhone. When the analysis is complete, browse photos one by one under the "Photo Stream", then select the items you want to recover.

Method 2: Recover lost iPhone Photo Stream without backup file


As long as you stop using your iPhone after you have deleted photos by mistake, you can also use iPhone Data Recovery Tool, a pure program to recover iPhone lost photo stream. Since the deleted photos may be replaced by the new data when you use your iPhone to take pictures or something. So, after your lost or deleted photo stream, perform recovery as soon as possible. To get a better understanding of this program, you can try the trial version before buying.

Step 1. Download, install and launch iPhone Data Recovery Tool on your computer and connect with iPhone via USB cable.

Step 2. Wait until the software automatically detects your iPhone and click "Start Scan" button.

Step 3. Under "Photo Stream" category you can preview all your lost photos. You can select the photos you want and recover them or transfer them to your iPhone.


5/27/2016

How to Fix an iPhone 6s Plus Stuck on iTunes Plug in

To the trouble case of iPhone 6s Plus stuck on iTuens Plug in, how can we fix the case in simple way? Since searching on Google, we can get the easy guide about how to fix that case as below.

To fix iPhone 6s Plus Stuck on iTunes plug in from using iPhone Care Pro


Tenorshare iPhone Care Pro is the professional tool to fix iOS common issues. Such as iOS stuck at Apple logo, red iTunes logo screen, recovery mode, DFU mode and repeatedly restart loop, etc.
Step 1: Download and install iPhone Care Pro on your computer. Then click fix ios stuck on the menu.

Step 2: Click start now then under exit recovery mode, waiting for your device boot up.
Step 3: When you iPhone 6 Plus start now, it means the stuck case has fixed.

How to brush iPhone 6s Plus and into DFU


Into DFU
Step 1: When ready, connect iPhone to iTunes, iTunes icon in the top left of the phone.Then press the side key lock screen off.

Step 2: After shutdown, iPhone is connected to iTunes will be turned off, then continue to hold down the lock screen button, iPhone appears like interface and power, then hold down the Home button, do not release the key lock screen.

Step 3: Waiting until the iPhone screen goes black, the loose lock screen button, continue pressing the Home key, which will work with iTunes when iPhone is connected, and the "detected an iPhone in recovery mode".

Brush firmware
Step 1: Here to click OK, hold down the "shift", and click "Restore iPhone".
Step 2: Select the downloaded firmware, if you do not know how the Internet to find the official firmware download, click on the top step, restore iPhone, iTunes will automatically download firmware.


Step 3: Then they do not have control, iTunes will automatically brush machine, download the firmware in advance, then wait for about ten minutes.
After recovery, you can reset about iPhone, if you have backed up on iTunes, connect to iTunes, you can choose to restore from a backup.

How to fix an insertion iPhone 6s Plus stuck on iTunes


Step 1: First to connect iPad application is synchronized look whether it will crash, if not, the problem on the iPhone, you need to restore the iPhone firmware, you need to back up data under.

Step 2: If the iPad crashes, the problem would be in the computer end, C: \ Users \ login username \ AppData \ Roaming \ Apple Computer folder inside SyncServices deleted, and then re-open itunes.

After reading the whole post, have you got how to fix iPhone 6s plus stuck on iTunes plug in easily? You can choose the simple way to follow.

5/12/2016

iPad Black Screen and Not Connecting, How to Fix

“Oh,my god! My iPad black screen and not connecting. It worked FINE before my Daughter logged into an app for Valentines Day, now the screen is all black and it wont turn off or back on. When you plug in the charger...nothing, hit any buttons...nothing?? What do I do? PLEASE help, single Mom not alot of money, so can't afford to take it in to be fixed.”

“The screen of my iPad Air 2 is black and unresponsive, currently the alarm is going off (so I know it is working) but the iPad screen is black and unresponsive. I have not dropped it, I have tried to power it off, but since there is no response. Who can help me?”

That’s so common our iPad frozen and appears to be dead and only show a black screen, which we call iPad black screen or iPad black screen of death.
But, don’t worry, in this article, I will introduce you a totally free way to fix the iPad black screen or iPad frozen issues.


How to fix iPad Black Screen?

Reiboot is a very excellent tool which is professional in fixing iOS black screen for free. According to users' feedback, all users have successfully fix iPad black screen of death with this totally free software. And it is very easy to use -- only 2 clicks.
1. Download and install Free Reiboot on your computer. Connect your iPad( iPad Pro, iPad Air 2, iPad mini 4/3, iPad Air, iPad mini 2, iPad 4, iPad Mini, the new iPad, etc.) to computer and run the program.
2. Click Enter Recovery Mode in the interface. Then close application and run it again. Click Exit Recovery Mode to finish.


The guide to use Reiboot to fix iPad black screen is not very difficult, isn’t it? Read the article How to Fix iPad Black Screen of Death, you will get more ways to fix iPad freezing. By the way, the Reiboot is also can used to solve the iPhone/iPod Touch frozen problems, fix iPhone SE/6S/6S Plus/6/6 Plus/5S/5/4S/4 blue screen of death after apdate to iOS 8/9/9.1/9.2/9.3 problem.

According to iPhone/iPad/iPod Touch users' feedback, they always worry about their iPhone important data (contacts, sms, photo, text messages, notes etc.) lost accidentally, iPad data deleted mistakenly, iPod Touch 6/5/4/3/2/1 music lost. At this time, suggest you can try to use iPhone Data Recovery Tool to help you.

4/29/2016

iOS 9.3 Lost Contact List, How to Fix the Issue

If you need to extract contacts from iTunes to new iPhone 6S/6s plus like the following question, this article will be a nice solution:
"I need help. How can I import contact list from my iTunes backup to iPhone 6s after iOS 9.3 update? I don't want to restore the whole iTunes backup data to iPhone 6s, for I have some other important data on my iPhone 6s. So how can I import only contacts from iTunes backup to my iPhone 6s? Thanks.”


iTunes backup is unreadable on computer. so you need an iPhone Data Recovery program which can extract your iTunes backups on PC/Mac. In that case, you will need a tool such as Tenorshare iPhone Data Recovery. It is a top-ranked iPhone Data Recovery tool, which can extract the iTunes backup on your Mac and get contacts out of it. Actually, it allows you to preview and selectively recover whatever you want from iTunes backup. You can finish the process in only 2 steps: scan and recover. Read its review to learn more. Here in this article, you will see what to do when iOS 9.3 lost contact list unfortunately.

Option 1: Selectively extract contacts from iTunes backup to iPhone 6S after iOS 9.3 Update

Step 1:Run the program and choose "Recover from iTunes Backup Files". Then choose the backup file to scan it.
Step 2: Once the scan process ends, all the data will be listed on the above according to the data categories.
Step 3: You can tick the “Contacts” and hit “Recover” to save them on Windows/Mac.
Finally, once you have selective backup the contacts from iTunes to Mac, you can transfer them to iPhone 6S after iOS 9.3 update.

Option 2: Effectively restore contacts from iPhone 6s after iOS 9.3 Update
Step 1: After download, install and launch the best iPhone 6s plus/6S data recovery on your computer. Connect your iPhone 6s plus/6s to computer via the provided USB cable and allow the application to automatically detect your device. If your device is not detected, make sure your USB cable is functioning accordingly and is properly inserted in the ports. Select “Recover from iOS device”, then you’ll see an interface which informs you that your device is connected. Click “Start Scan” to continue.
Step 2. Go to Computer and find the flash drive. Open it and contents on SD card show up in front of you.
Step 3. After the scan is complete, the application window will show you a list of both existing and lost data in your iPhone 6s plus/6s. There stays an option to only display deleted items in the application. You can also search for lost data by mentioning its name in the search bar provided.
Step 4. Place a check mark alongside the data you require and then click the “Recover” button allowing the data to be saved by default on your computer. For data involving iMessages, notes or contacts, there will be an option popping up asking whether to save the data on your pc or directly in your device.

4/27/2016

How to Clean and Speed Up iPad Pro/Air 2/Mini 2,4

Since you made the update of your iPad Pro/Air 2/Mini 2,4 with iOS 9.3, you found your iPad has become slow and lost sensitivity on the touch screen which annoys you? Don't worry, here are some simple ways to clean and speed up your iPad again!

iPad runs slowly often due to a large number of unwanted and junk files generated by applications. And these files consume a large amount of RAM and storage space when you run multiple applications, browse the Internet by opening multiple tabs, or play in large games.

So the first thing you need to do to clean and speed up you iPad is to remove any apps that you no longer use.

Then delete the junk files insides the apps, go to Settings > General > Storage & iCloud Usage to do it.

After that, it is better to turn off features you can manage without, go to Settings > General > Background App Refresh to do it.

And the last thing you must to do is clean up the iPad Safari cache, just go to Settings > General > Clear History and Website Data to do it.

Do you feel trouble about the methods above? And afraid of delete some important data from your iPad? Don't worry, that's why you need a convenient tool for iPad like Free iPhone Care, a deep cleaner for iPad.


By detecting and deleting unnecessary files on iPad, Free iPhone Care is able to free up space on your iPhone/iPad to retrieve more memory and to run faster on your iPad Pro/Air 2/Mini 2,4. It supports different types of unwanted and junk files to make it faster, like the Caches/Cookies/Temporary files, crash logs, etc.

In addition, there is another iPhone Care Pro version which can fix iPhone/iPad stuck problem, repair iOS system for iPad, block ADs from iPad, backup and restore iPad data. Such a system care software for iPad, we think you may want to try.

3/29/2016

How to Delete All iMessages from Macbookpro

To the situation that you want to delete all imessages from Macbookpro in easy way, which method do you like? To follow simple guide or to use professional tool. As below you can learn how to delete imessages from Macbookpro from both option.

How to use Tenorshare iPhone Care Pro to delete all imessages from Macbookpro


Tenorshare iPhone Care Pro is a all in one powerful tool to fix common troubles for iPhone users. Such as transfer music, videos, apps without iTunes restriction, great utility to clean up and speed up iPhone, iPad and iPod, fix various iOS stuck related to iOS upgrade, overheat and more, ultimate solution to repair iOS system, block ads on iPhone, iPad and iPod, and the last is to backup and restore iOS data.


Step1: Download Tenorshare iPhone Care Pro from the website as below. Then open the tool to connected with your iOS device.
Step2: Choosing the option "clean and speed up" to clean your iOS device. After that, choose deep clean, and click scan.

Step3: After that, you will find all imessages from your macbookpro is out of here. Then choose don't need and click clean now, the imessages will be deleted in a short time.
That is the most easy way for me( a computer idiot ) to deleted all imessages from Macbookpro in safest way.

How to delete iMessages chat history from Macbookpro


Method 1:
Step1: Quit out of Messages for Mac.
Step2: Hit Command+Shift+G to bring up the “Go To Folder” window. Entering ~/Library/Messages/.

Step3: Select all files in the Messages directory and move to trash, files will be named chat.db, chat.db-shm, chat.db-wal, etc.
Step4: Empty the Trash and relaunch iMessages.

Method 2:
Step1: This feature needs to be set on a iphone phone (provided that the use of computers and mobile phones through an apple ID).

Step2: Click Settings on your phone.
Step3: Information - information transfer.
Step4: Macbook open can.

After reading the top 2 methods for how to delete all imessages from Macbookpro, having you mastered which one is much better for you? If not, you can read again. Good luck to you.

3/03/2016

How to Recover Deleted Photos From an iPhone 6 After iOS 9.1 Update

As an iPhone 6 user, will you often encounter the following situation? Your iPhone 6 pictures lost after Ios upgrade? Most people said they did. So, more and more people begin to focus on the iPhone data recovery software now. But, do you know how to use the iPhone data recovery software. In this article, I will introduce you 3 best ways to recover deleted photos from an iPhone 6 after iOS 9.1 update with iPhone data recovery software on win.

Way 1 Recover iPhone Photos Directly from iPhone 6


If you have not backup your photos with your iTunes or iCloud, you can get back deleted photos on iPhone directly.

1. After free download the iPhone data recovery on win ! Connect your iPhone 6 to computer 
2. Choose "Recover Data from iOS Device", and then click "Start Scan". 
3. After scanning, preview all your photos and select what you want to 
recover and click on "Recover".


Way 2 Undelete Deleted iPhone 6 Photos from iTunes Backup


If you have backed up your iPhone 6 photos with iTunes on your computer, great! You can undelete iPhone photos from iTunes Backup.

1. Launch the software and choose "Recover Data from iTunes Backup File". 
2. Choose a backup file and click on "Start Scan".
3. After scanning, preview all your photos and select what you want to recover and click on "Recover".


Way 3 Retrieve Deleted iPhone 6 Photos from iCloud Backup


If you have an iCloud account and have backed up files in iCloud before, you can retrieve deleted iPhone photos from iCloud Backup.

1."Recover Data from iCloud Backup" and log into your iCloud account.
2. Scan your iCloud backup.
3. Preview all iPhone photos and choose the one you want. Click "Recover".


Now, your lost iPhone 6 images must be come back! By the way, if you want to recover lost photos from iPhone 6 on Mac, you can click here!


2/26/2016

How to Update Firmware to Frozen iPhone through iTunes

For a variety of reasons, you may not want to use the most recent version of iPhone firmware, and for other reasons, your iPhone may freeze because of new iOS update, iOS jailbreak, so is there any way to update iPhone firmware through iTunes when iPhone is stuck in recovery mode or iTunes red logo or others?

Of course there are some ways to update the firmware through iTunes on a frozen iPhone, but we need to put this problem into two parts, one part is to fix the freezing issue on iPhone, and the other part is update iPhone with a selected version of iPhone firmware.


Part 1. How to fix a frozen iPhone


The first thing you need to do is to fix the frozen iPhone, and there are several methods you can try them one by one.

Method 1. Restart


Many problems of iPhone can be solved by restarting, and you can also try it for a frozen iPhone. Just press the Home and the Power button simultaneously until the Apple logo comes back on again.

Method 2. Reboot


If the method 1 couldn’t worked, you may need a third-party software to reboot your iPhone, here is an free iPhone reboot tool enables you to fix iPhone freeze problem, the software only has two buttons, “Enter Recovery Mode” and “Exit Recovery Mode”, with it, you can fix iPhone freeze with only one click.

Part 2. Update iPhone with a selected version of iPhone firmware.


Step 1. Hold the SHIFT key while clicking the "Update" or "Restore" button in the iPhone tab in iTunes.

Step 2. Then a dialog box will come up which will allow you to select the firmware file to use for your update. Just select the version of firmware you want to update.

Now you complete the upgrade of firmware on your frozen iPhone.

1/25/2016

How to Turn Off to Find My iPhone iOS 8

In the case that you use iOS 8 and lost iPhone accidently. How to trun off to find my iPhone iOS 8 in safest and quickest way? There is a detail guide to teach us more about Find my iPhone and how to turn off to find my iPhone iOS 8.

Easy guide to learn how turn off to find my iPhone iOS 8


Many Apple users for iCloud how close the find my iPhone does not very understand, it's really quite simple, iOS8 close the find my iPhone, just a simple three-step fix, the following close method is specific.
Step1: The iPhone interface clicks on the settings button, and then locate and click here to enter "iCloud" setting.

Step2: Access iCloud settings, we found at the bottom of the "find my iPhone" settings option and click on enter.
Step3: And then "find my iPhone" behind "the Green switch" off into dust represents turn off.

Step4: Turn off the find my iPhone usually need an Apple ID password, we enter the correct password, and then click on the bottom of the "closed" can be done.

What is the Find my iPhone


Find My iPhone is Apple iPhone launched unexpectedly lost uses a feature in the iPhone, although thieves don't expect to rely on the back, but if it is a mobile phone in the taxi or dropped it somewhere is useful, this feature is suggest to open for a long time, just in case.

How to turn on Find My iPhone


Step1: Open the settings-> iCloud.
Step2: If you are not logged in before, your Apple ID login if landed on, you can directly open the find my iPhone.


How to use Find My iPhone


Step1: Open iCloud official website, in pop-up of landing interface in the entered and iPhone Shang landing iCloud consistent of Apple ID.
Step2: Landing finished, select find my iPhone.
Step3: If speed of Internet is fast enough, it will show your iPhone location in map in quickest way.

Step4: If iPhone has lost, then on canon you of iPhone for some operation, including play ringtones, and lock and wipe off iPhone.
Note: If the iPhone is not locking, any person who finds your iPhone will be able to turn off the Find My iPhone feature in the settings, so the iPhone must be unlocked.

After reading that, have you learn more about Find My iPhone and how to turn off to find my iPhone iOS 8 in easy way? If you did not get that information in details, you can read again. Good luck to you.

1/19/2016

Top 3 Ways to Get Out of Infinite Loop on iPhone 6

Your iPhone 6 gets into an endless reboot loop or keeps restarting? Your iPhone 6 freezes at slide to upgrade screen after update to iOS 9?
Don’t worry, in this article, I will introduce you 3 good ways to help you get out of infinite loop on iPhone 6.

Way 1: Hard Reset

If your iPhone 6 power button and the Home button are still workable, the hard reset comes in handy. Press and hold both the Sleep/Wake and Home buttons for 8-10 seconds, until you see the Apple logo. This should get you out of iOS 9 reboot loop.

Way 2: Use Free ReiBoot

Free ReiBoot is a powerful and totally free tool to help you get out of boot loop problem in iOS update or iOS jailbreak. It forces reboot your iPhone, iPad, iPod and make them back to normal without data loss.

How to use Reiboot to get out of boot loop?

1. After download Reiboot to your computer, connect your iPhone 6 to computer, then run ReiBoot. The program will detect your device automatically.
2. Click on "Enter Recovery Mode". ReiBoot will remind you if your iPhone 6 is already in recovery mode.
3. Click on "Exit Recovery Mode" and your iPhone 6 will boot up.
get out of infinite loop on iphone 6

Way 3: Use Tenorshare iPhone Care Pro

Your iPhone 6 still stuck on boot loop after trying all methods above? Don’t worry, Tenorshare iPhone Care Pro is a good tool to backup and restore Iost iPhone data, what's more, it can help you fix all iPhone stuck issues just like: iOS crash, upgrade failure, stuck on boot loop.
fix iPhone stuck in boot loop
Hope the 3 ways above can give you help! If you have any more good ways to fix iPhone stuck in boot loop, please share to us!